Walk Through a Change
Tento obsah zatím není dostupný ve vašem jazyce.
bmad-walkthrough walks you through a finished change — from purpose and
context into details — so you can decide whether to approve, rework, or
discuss further. See how a run works.
This is human comprehension, not a substitute for the review bmad-build
already ran, or for bmad-code-review.
When to Use It
Section titled “When to Use It”The primary handoff is from bmad-build.
Implementation is done, the spec file is open with a review trail appended,
and you need to decide whether to ship. Say “walkthrough” and go.
Build runs long with little supervision. Walkthrough is where you take back the wheel. You could eyeball the diff, but once the change spans many files you lose the thread, miss a connection, or approve something you did not fully understand. A raw diff presents files in git order, which is almost never the order that builds understanding.
It also works standalone:
- Reviewing a PR — especially one with more than a handful of files or cross-cutting changes
- Onboarding to a change — when you need to understand what happened on a branch you didn’t write
- Sprint review — the workflow can pick up stories marked
reviewin your sprint status file
Invoke it by saying “walkthrough” or “walk me through this change.” It works
in any terminal, but you’ll get more out of it inside an IDE — VS Code,
Cursor, or similar — because it produces path:line references at every
step. In an IDE-embedded terminal those are clickable.
Run bmad-walkthrough
Section titled “Run bmad-walkthrough”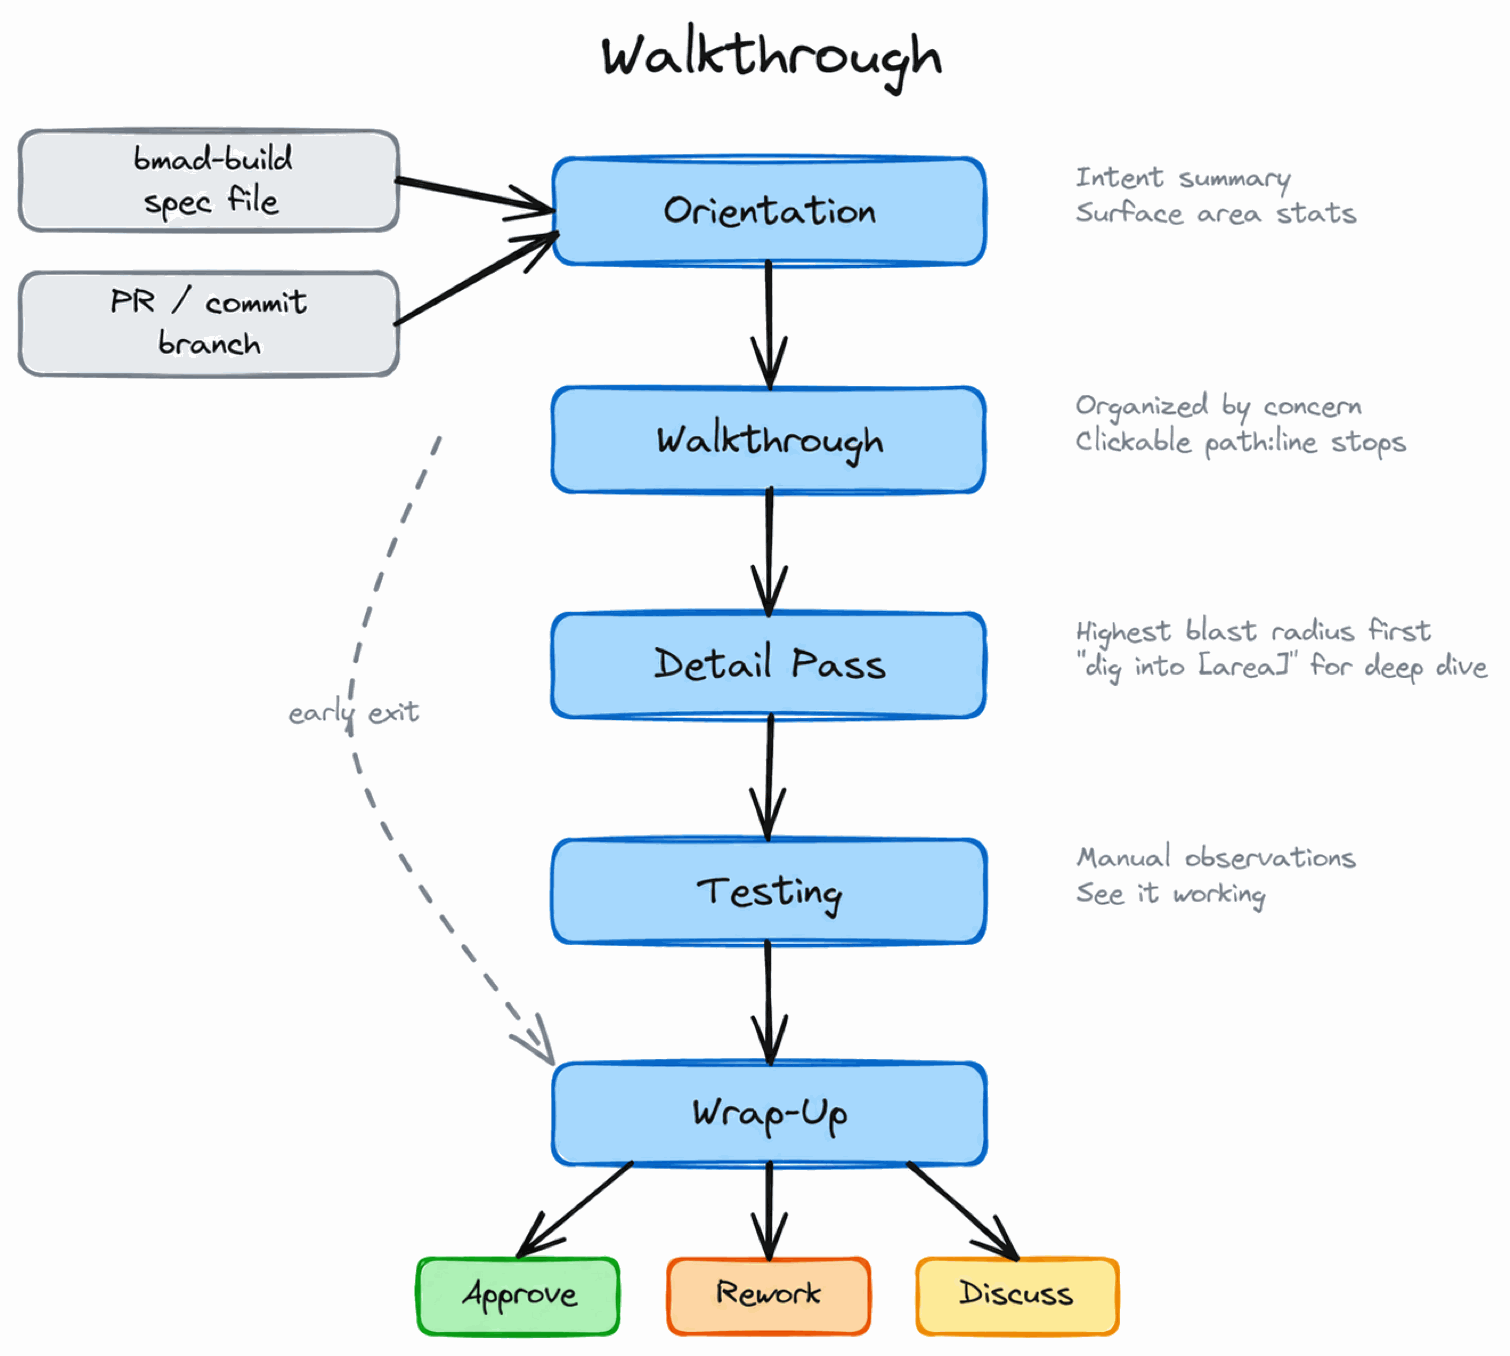
After bmad-build finishes, you can say “walkthrough” in the same chat. To
review something else, start a fresh chat and run /bmad-walkthrough with a
PR, branch, spec path, or the current git state.
walkthrough/bmad-walkthrough Review https://github.com/org/repo/pull/42The workflow has five steps. Each one builds on the last, shifting from
“what is this?” toward “should we ship it?” The skill reads the diff, the
spec if one exists, and the surrounding codebase, then presents the change
in an order designed for comprehension — not for git diff.
1. Orientation
Section titled “1. Orientation”The workflow identifies the change (from a PR, commit, branch, spec file, or the current git state) and produces a one-line intent summary plus surface area stats: files changed, modules touched, lines of logic, boundary crossings, and new public interfaces.
This is the “is this what I think it is?” moment. Before reading any code, you confirm you’re looking at the right thing and calibrate your expectations for scope.
2. Walkthrough
Section titled “2. Walkthrough”The change is organized by concern — cohesive design intents like “input
validation” or “API contract” — not by file. Each concern gets a short
explanation of why this approach was chosen, followed by clickable
path:line stops that you can follow through the code.
This is the design judgment step. You evaluate whether the approach is right for the system, not whether the code is correct. Concerns are sequenced top-down: the highest-level intent first, then supporting implementation. You never encounter a reference to something you haven’t seen yet.
3. Detail Pass
Section titled “3. Detail Pass”After you understand the design, the workflow surfaces 2–5 spots where a
mistake would break the most. These are tagged by risk category — [auth],
[schema], [billing], [public API], [security], and others — and
ordered by how much breaks if they’re wrong.
This is not a bug hunt. Automated tests and CI handle correctness. The detail pass activates risk awareness: “here are the places where being wrong costs the most.” If you want to go deeper on a specific area, you can say “dig into [area]” for a targeted correctness-focused re-review.
If independent agents already reviewed the spec, those findings show up here too — not the bugs that were fixed, but the decisions they flagged that you should know about.
4. Testing
Section titled “4. Testing”Suggests 2–5 ways to manually observe the change working. Not automated test commands — manual observations that build confidence no test suite provides. A UI interaction to try, a CLI command to run, an API request to send, with expected results for each.
If the change has no user-visible behavior, it says so. No invented busywork.
5. Wrap-Up
Section titled “5. Wrap-Up”You make the call: approve, rework, or discuss further. For a local
bmad-build result, approve means you are ready to push — the agent can
help push and open a PR. Rework means send it back in the same session. If
approving a PR, the workflow can help with gh pr review --approve. If
reworking, it helps diagnose whether the problem was the approach, the spec,
or the implementation, and helps draft actionable feedback tied to specific
code locations.
It’s a Conversation, Not a Report
Section titled “It’s a Conversation, Not a Report”The workflow presents each step as a starting point, not a final word. Between steps — or in the middle of one — you can talk to the LLM, ask questions, challenge its framing, or pull in other skills to get a different perspective:
- “run advanced elicitation on the error handling” — push the LLM to reconsider and refine its analysis of a specific area
- “party mode on whether this schema migration is safe” — bring multiple agent perspectives into a focused debate
- “run code review” — generate structured agentic findings with adversarial and edge-case analysis
The walkthrough workflow doesn’t lock you into a linear path. It gives you structure when you want it and gets out of the way when you want to explore. The five steps are there to make sure you see the whole picture, but how deep you go at each step — and what tools you bring in — is entirely up to you.
The Review Trail
Section titled “The Review Trail”The walkthrough step works best when it has a Suggested Review Order — a list of stops the spec author wrote to guide reviewers through the change. When a spec includes this, the workflow uses it directly.
When no author-produced trail exists, the workflow generates one from the diff and codebase context. A generated trail is lower quality than an author-produced one, but far better than reading changes in file order.
What It Is Not
Section titled “What It Is Not”bmad-walkthrough is not the review skill. It does not replace the review
bmad-build already ran, a re-invoke of that run on a done story, or
bmad-code-review. It does not run linters, type checkers, or test suites.
It does not assign severity scores or produce pass/fail verdicts. It is a
reading guide that helps a human apply their judgment where it matters most.